TA的每日心情 | 怒
1 小时前 |
|---|
签到天数: 391 天 [LV.9]以坛为家II

管理员
- UID
- 5
- 元宝
- 5039
- 威望
- 640
- 贡献
- 141
- 信誉值
- 0
- 精华
- 0
- 在线时间
- 182 小时
- 注册时间
- 2014-1-11
- 最后登录
- 2026-2-15
- 违规
- 1
- 积分
- 2456

|
一、编译环境 1.1 编译整体配置
采用VS2022社区版+MSVC2017_xp+QT5.6.0+WDK7.1(编译DDK需要,不需要DDK的可以不用下载)
1.1 VS2022安装
1.1.1 除常规勾选桌面C++以外,需要勾选win xp支持和支持相应的MSVC版本。教程采用msvc2017和xp支持
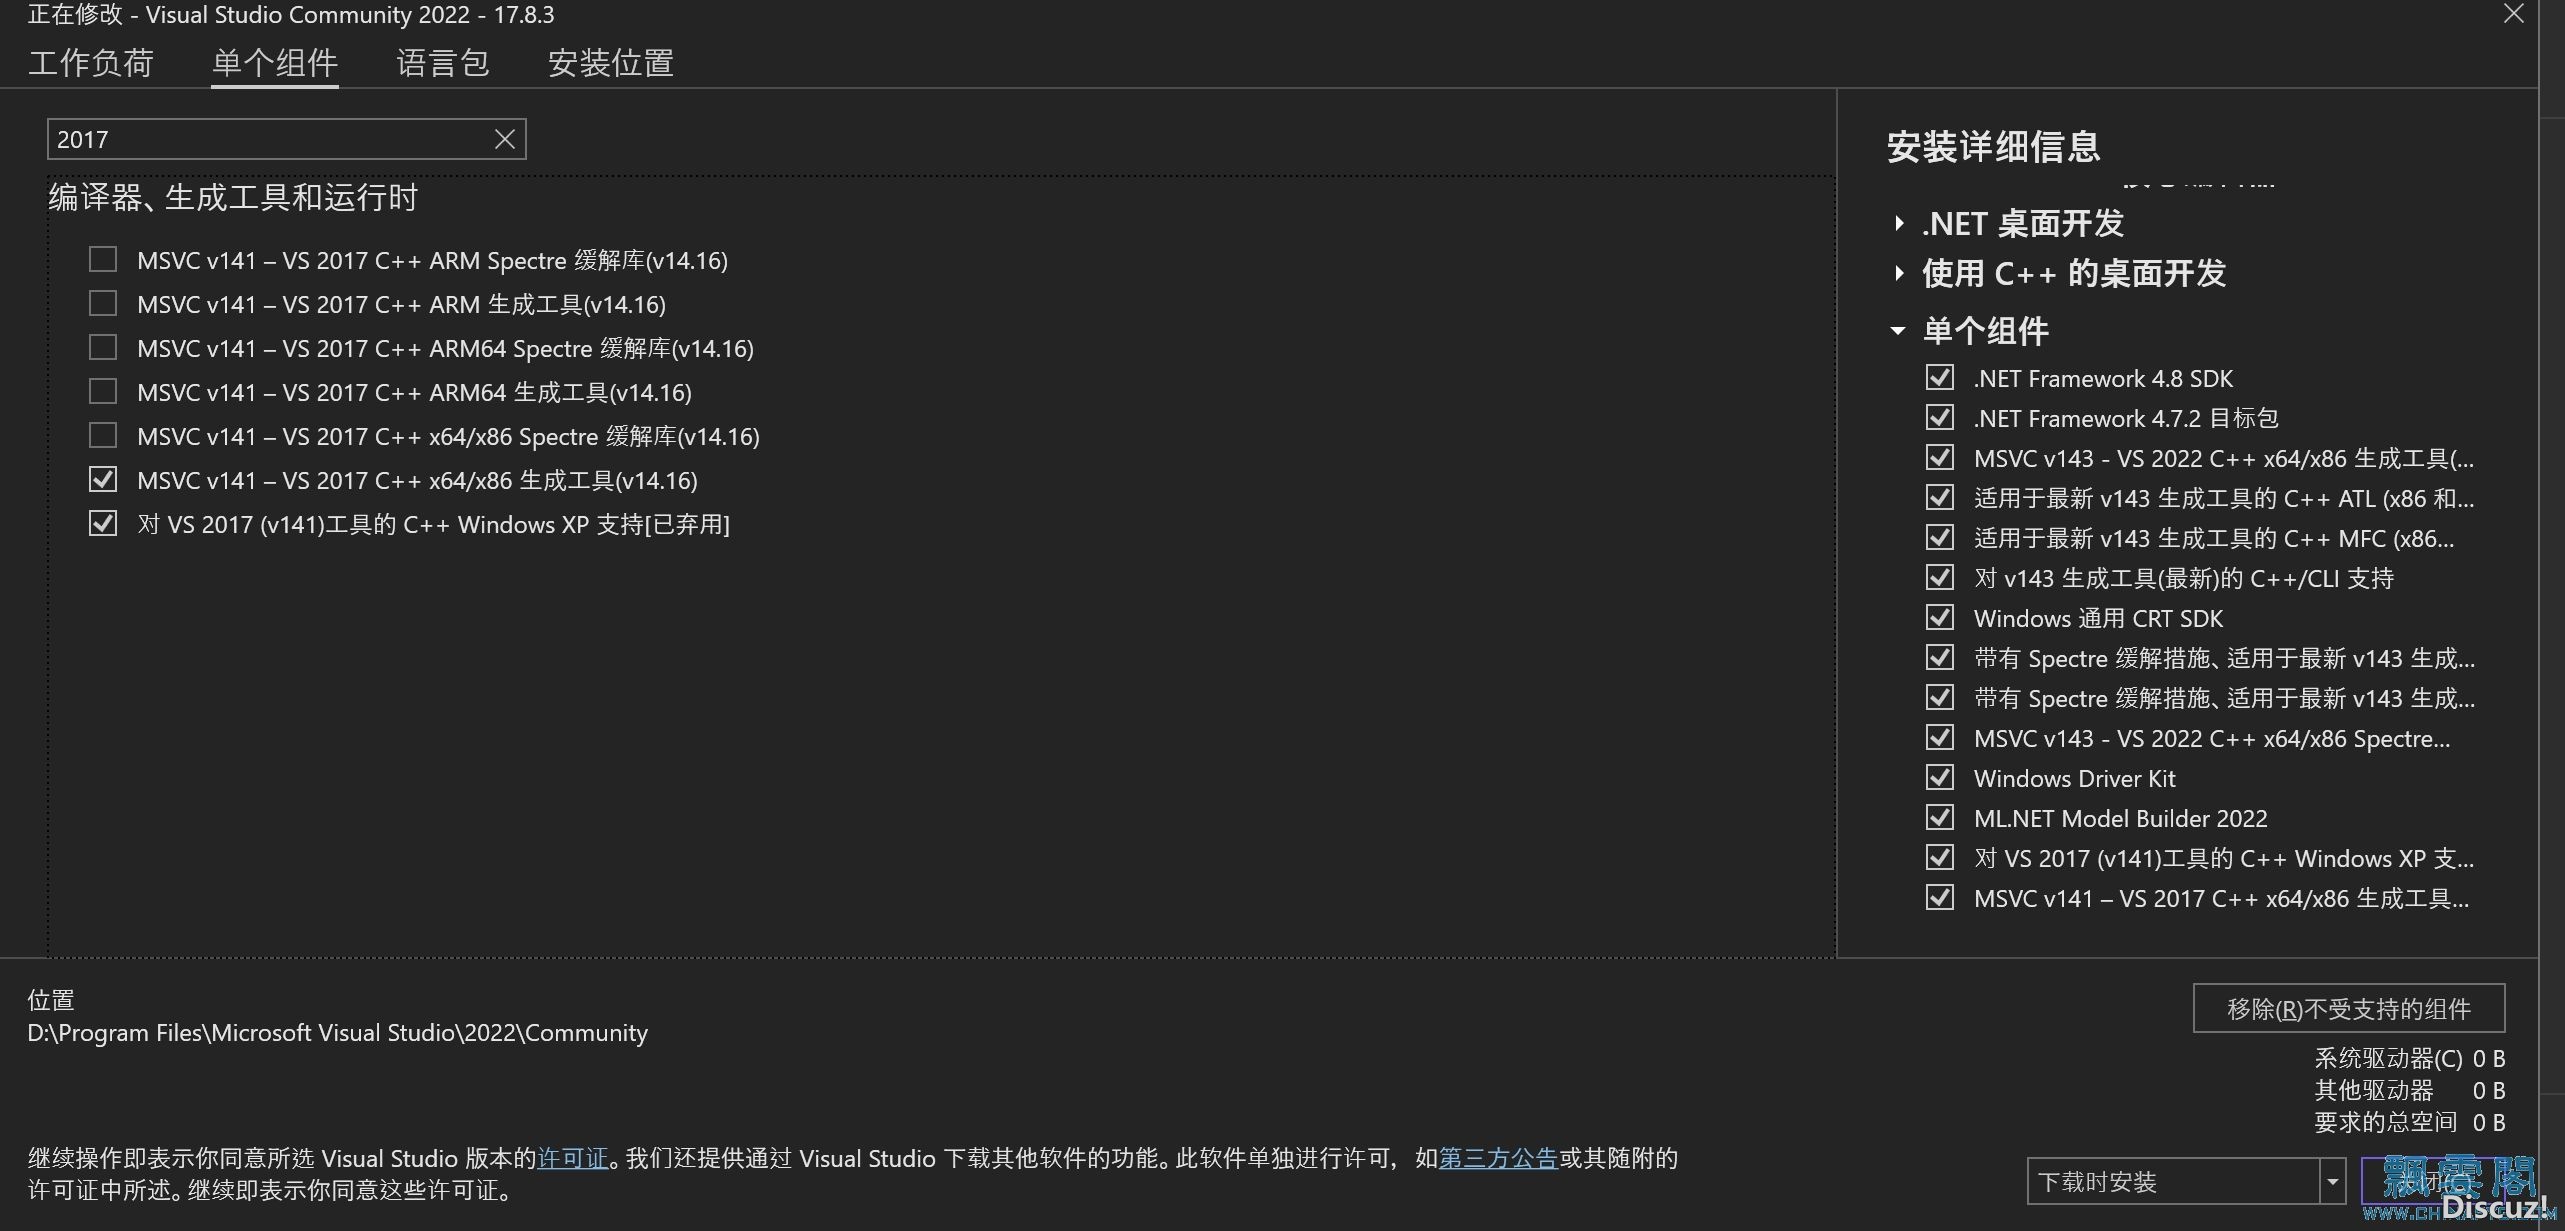
1.1.2 安装好xp支持会同步安装win7.1A SDK,不用另行安装。
1.2 Qt安装与配置 1.1.1 [QT5.6.0下载](https://download.qt.io/new_archive/qt/5.6/5.6.0)根据需求选择32位或者64位。选择5.6.0原因是VMP原项目采用的就是5.6.0,以及支持XP。高版本QT不支持XP。教程采用64位即:qt-opensource-windows-x86-msvc2015_64-5.6.0.exe
1.1.2 QT5.6.0 下载后直接默认安装,安装完毕即可,注意:不需要设置系统环境变量和安装VS QT插件。
1.3 WDK7.1安装 1.3.1 [WDK7.1下载](https://learn.microsoft.com/zh-c ... other-wdk-downloads)编译DDK需要,不需要DDK的可以不用下载
二、编译过程 2.1 开始编译(Debug版本,动态链接QT)
2.1.1 打开VMP工程,出现提示升级和Net版本不匹配,笔者选择取消。然后手动更改MSVC版本为2017_xp。
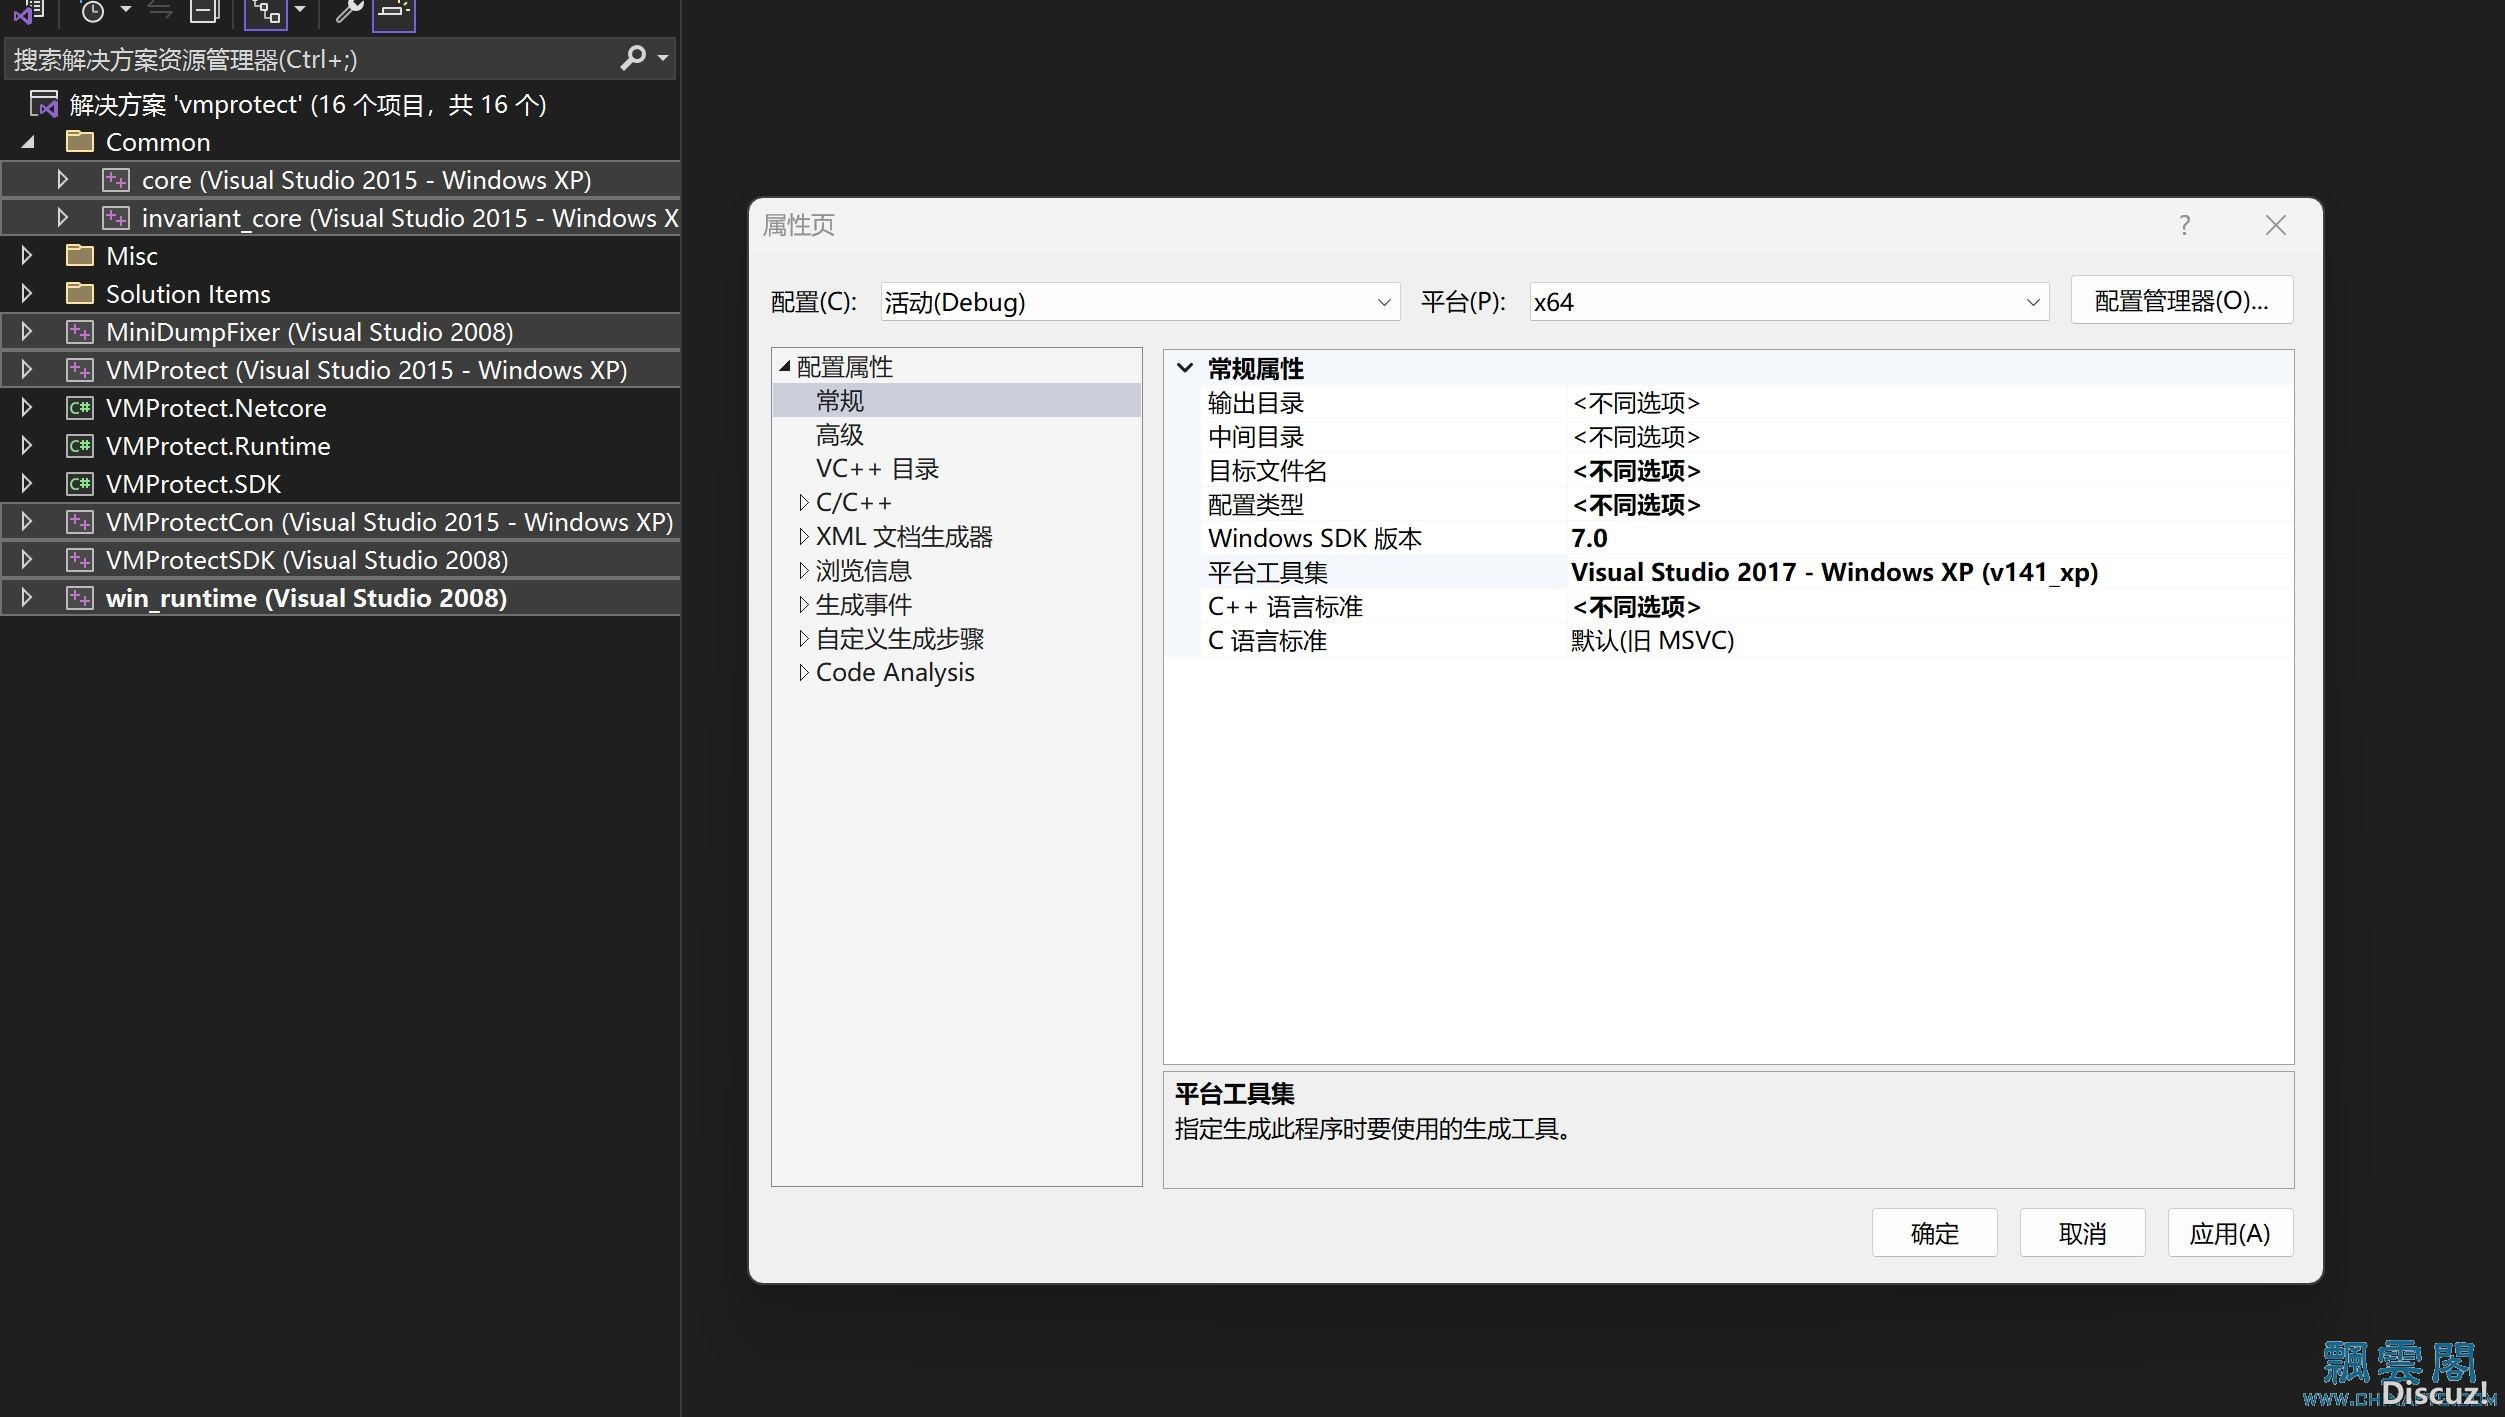
2.1.2 首先编译Common两个工程。其中Core会报错。
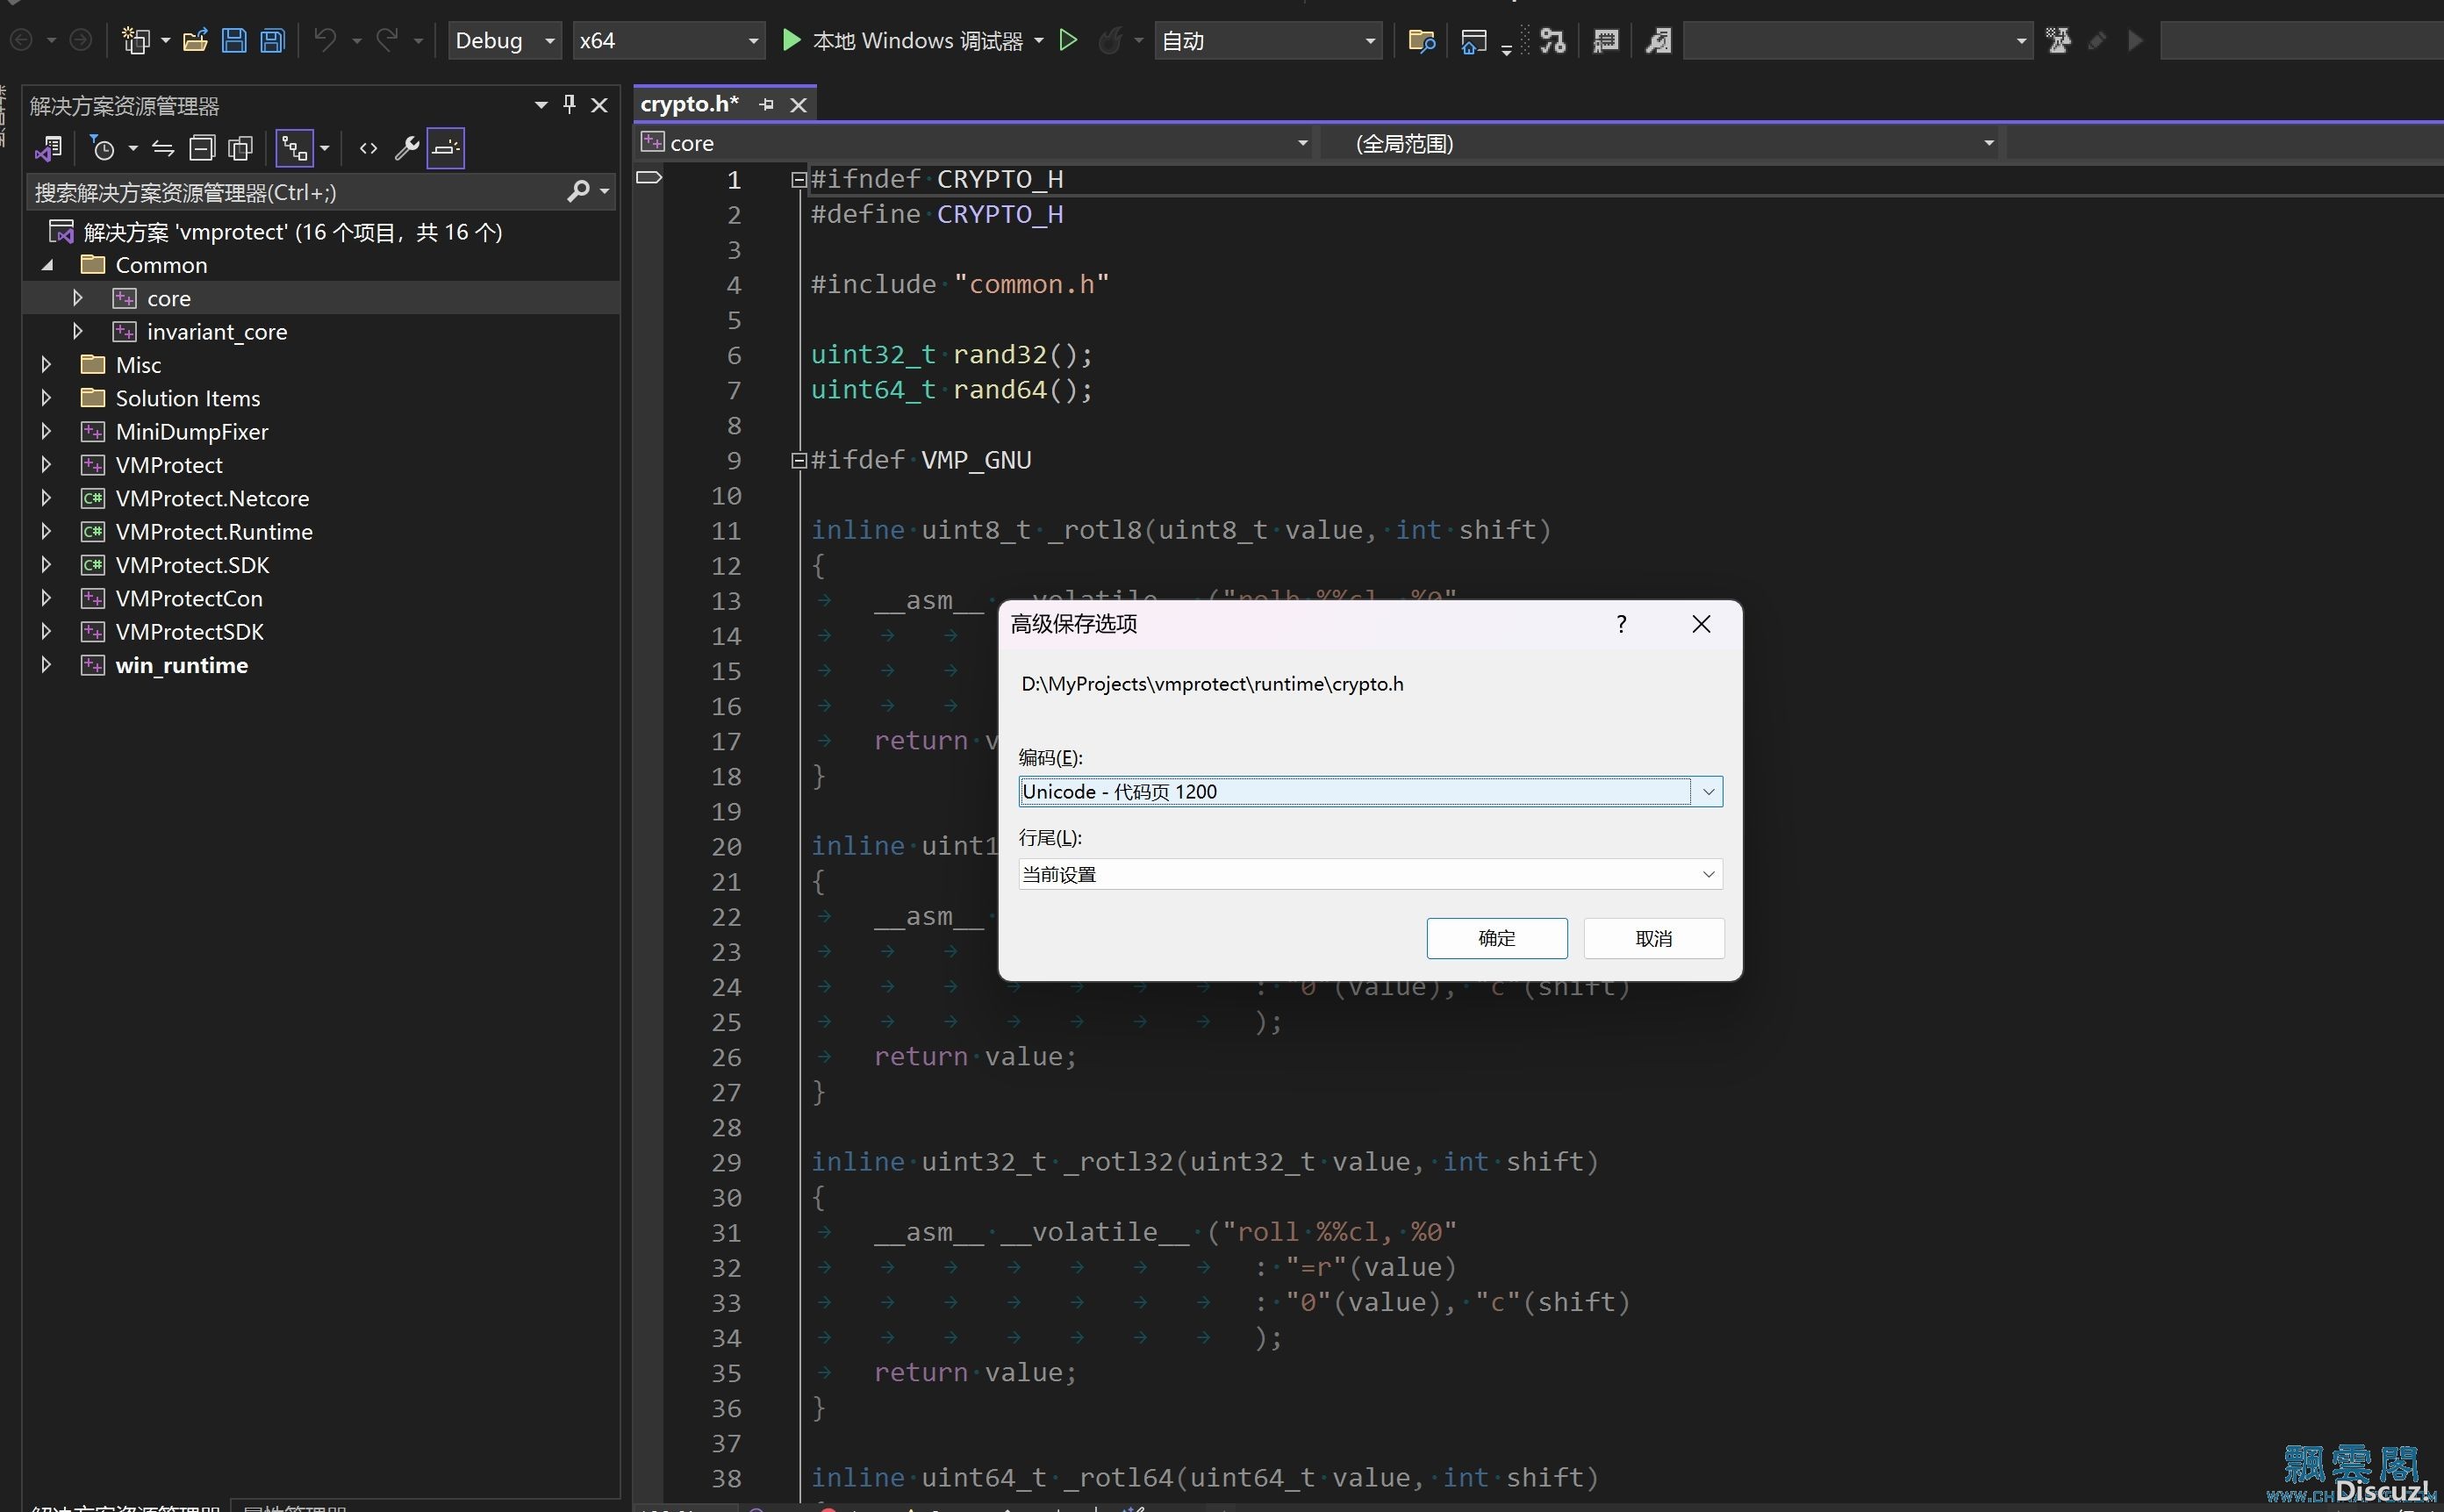
错误1、编码报错:双击打开错误打开文件,然后点击:文件——高级保存选项——以"Unicode-代码页1200"保存。提示:错误指向相同的文件只需要保存一次即可,不用每个错误都操作。没有高级保存选项,在工具——自定义设置。具体百度。
[C++] [color=rgb(51, 102, 153) !important]纯文本查看 [color=rgb(51, 102, 153) !important]复制代码
[backcolor=rgb(27, 36, 38) !important][color=white !important][color=white !important] ?
| warning C4819: 该文件包含不能在当前代码页(936)中表示的字符。请将该文件保存为 Unicode 格式以防止数据丢失
|
错误2、重载定义:根据函数声明补充定义函数的参数
[C++] [color=rgb(51, 102, 153) !important]纯文本查看 [color=rgb(51, 102, 153) !important]复制代码
[backcolor=rgb(27, 36, 38) !important][color=white !important][color=white !important] ?
| error C2511: “voidIntelFunction::Mutate(const CompileContext &,bool)”:“IntelFunction”中没有找到重载的成员函数
|
补充后的的定义:
[C++] [color=rgb(51, 102, 153) !important]纯文本查看 [color=rgb(51, 102, 153) !important]复制代码
[backcolor=rgb(27, 36, 38) !important][color=white !important][color=white !important] ?
| cpp void IntelFunction::Mutate(constCompileContext &ctx, bool for_virtualization, int index)
|
[C++] [color=rgb(51, 102, 153) !important]纯文本查看 [color=rgb(51, 102, 153) !important]复制代码
[backcolor=rgb(27, 36, 38) !important][color=white !important][color=white !important] ?
| voidIntelObfuscation::Compile(IntelFunction *func, size_t index, size_t end_index ,bool for_virtualization)
|
至此Common工程编译成功。
2.1.3 编译win_runtime、VMProtectSDK、VMProtecCon三个工程。顺利编译,不再展开说明。
2.1.4 编译VMProtect
2.1.4.1 修改QT路径。
在VS属性管理器(非右键项目-属性。视图-属性管理器)展开VMPProtect-Debug|X64,右键"qt_debug64"属性-用户宏,将QT路径修改成自己安装的路径。
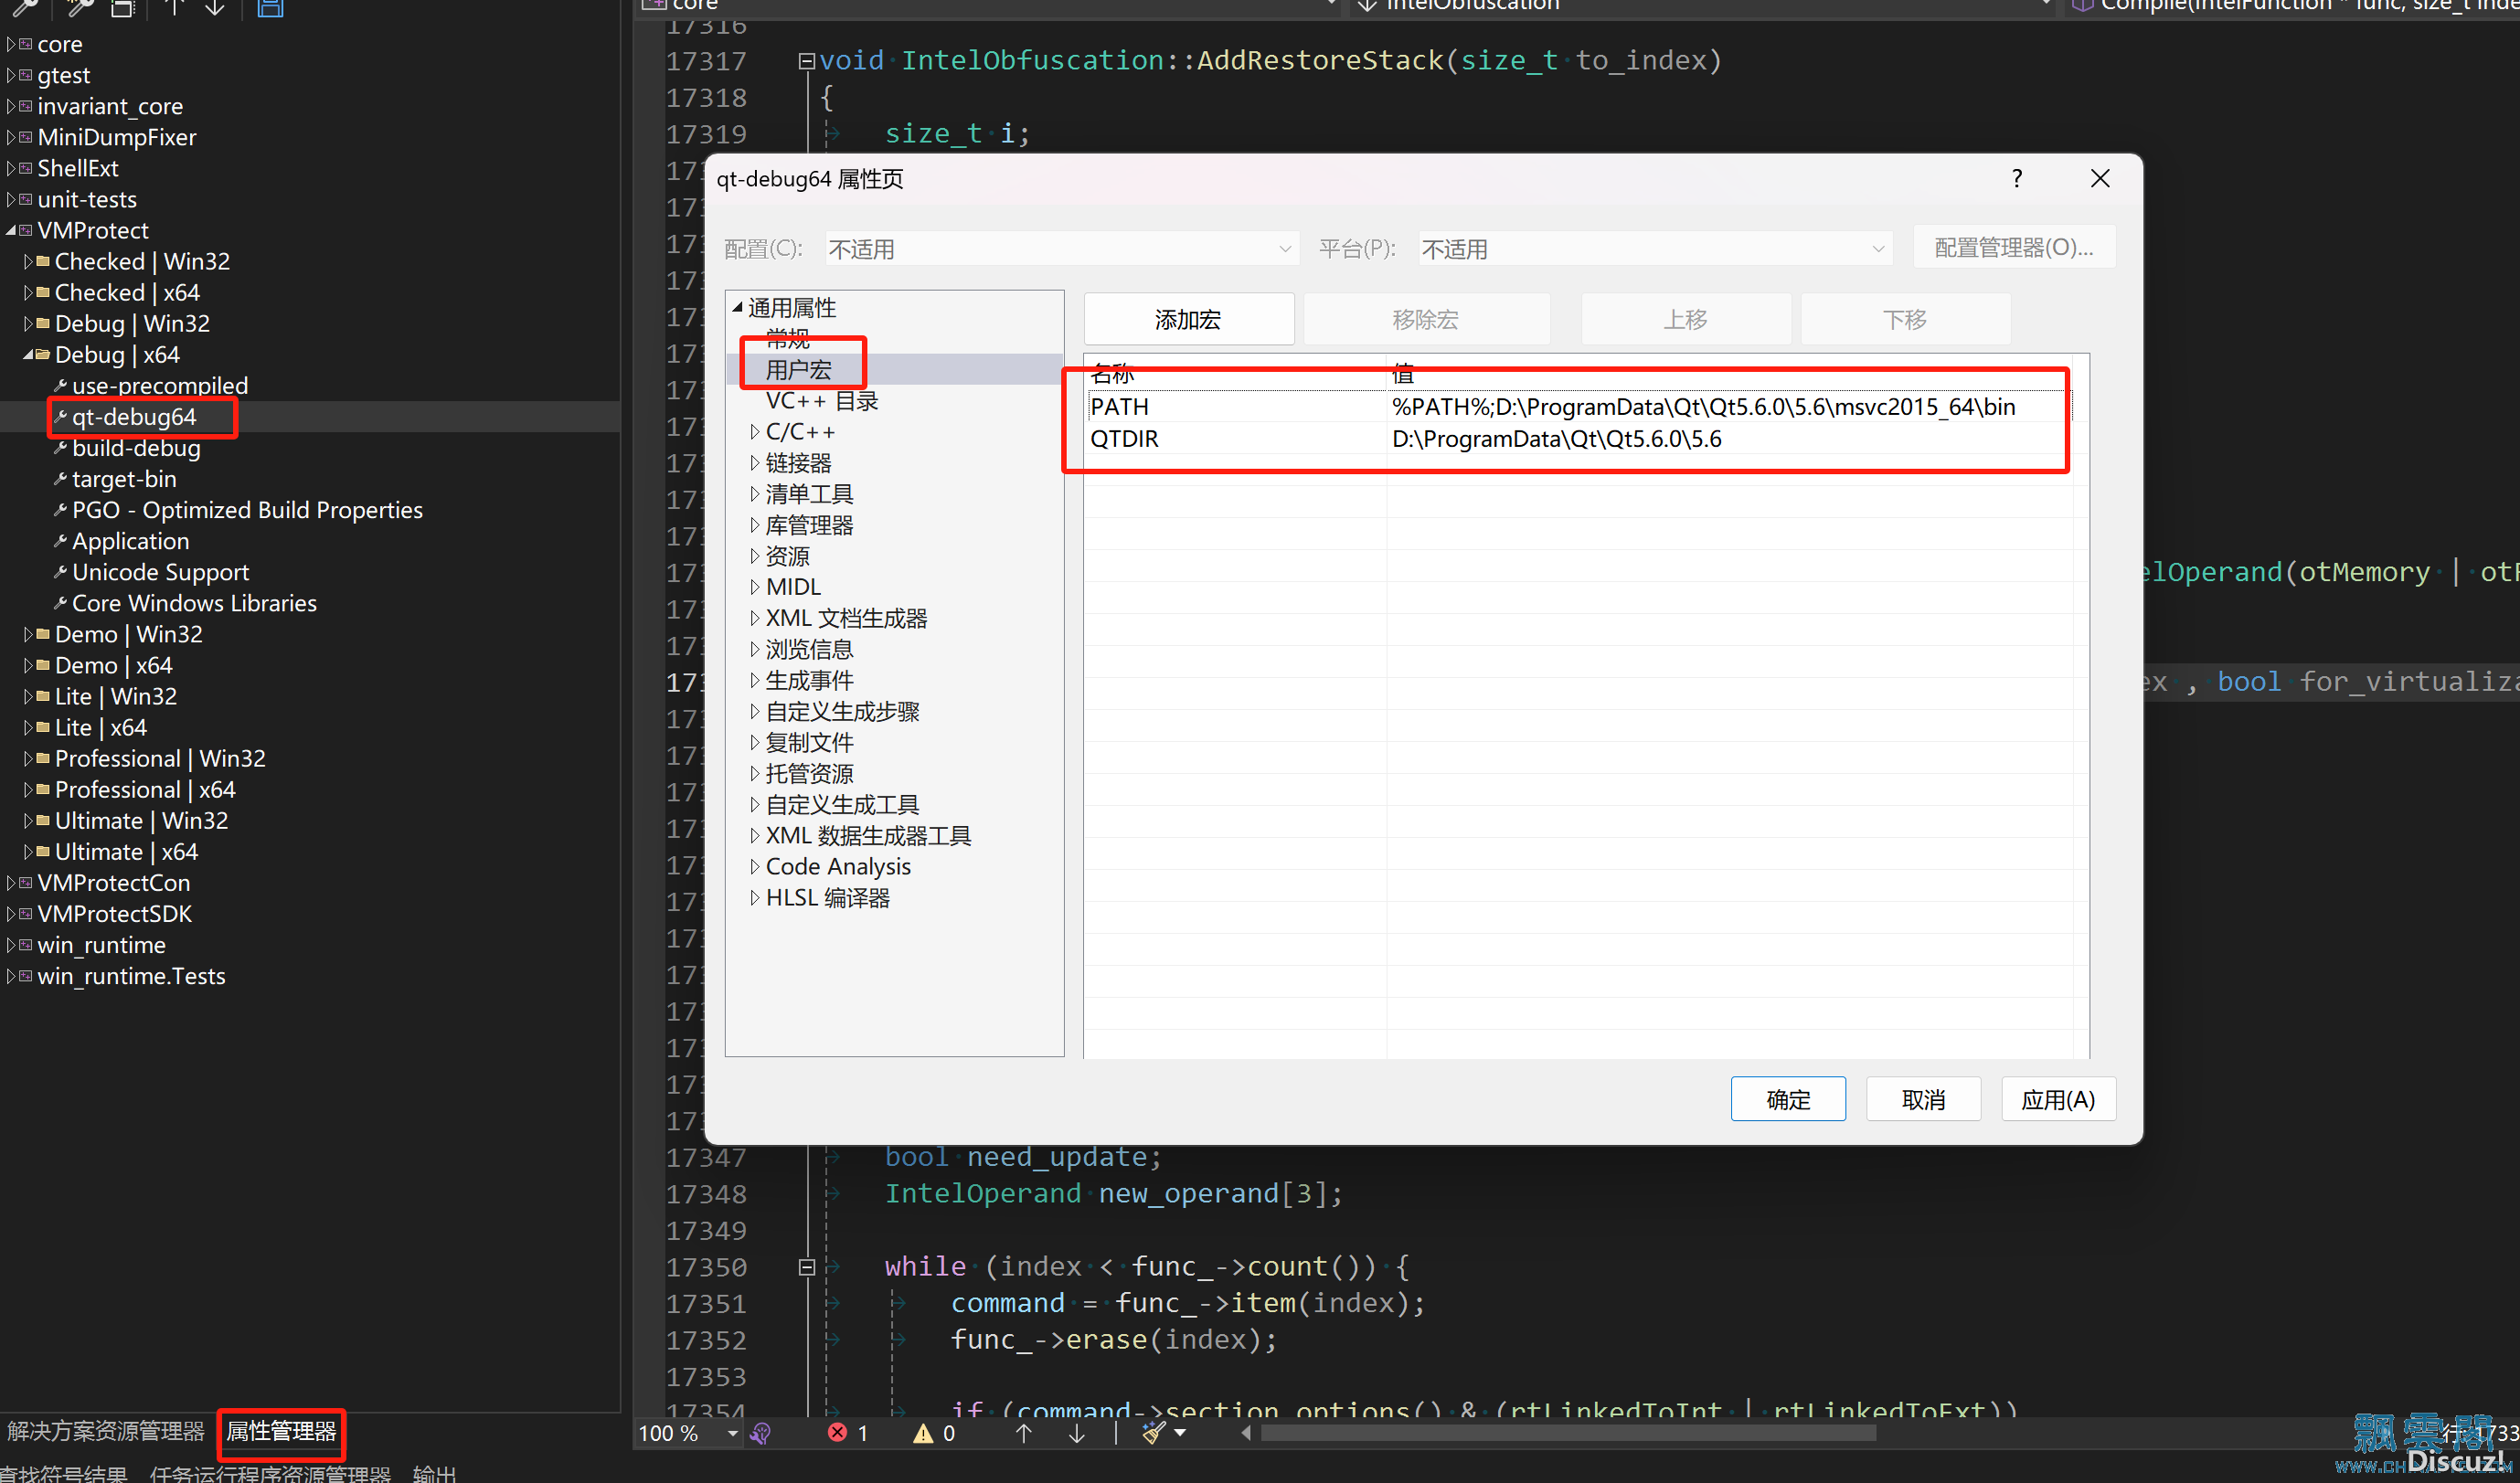
至此VMProtect Debug版本可顺利编译。将core目录下的VMProtectLicense.ini文件和编译好的VMProtect.exe放一起,即可显示已授权版本。(QT文件自行补充)只是玩一玩的看到这里就可以结束了。
2.1.5 编译DDK
2.1.5.1 修改WDK路径,同样在属性管理器修改Driver的WDK inlude路径为自己安装的路径。默认路径则不用修改。
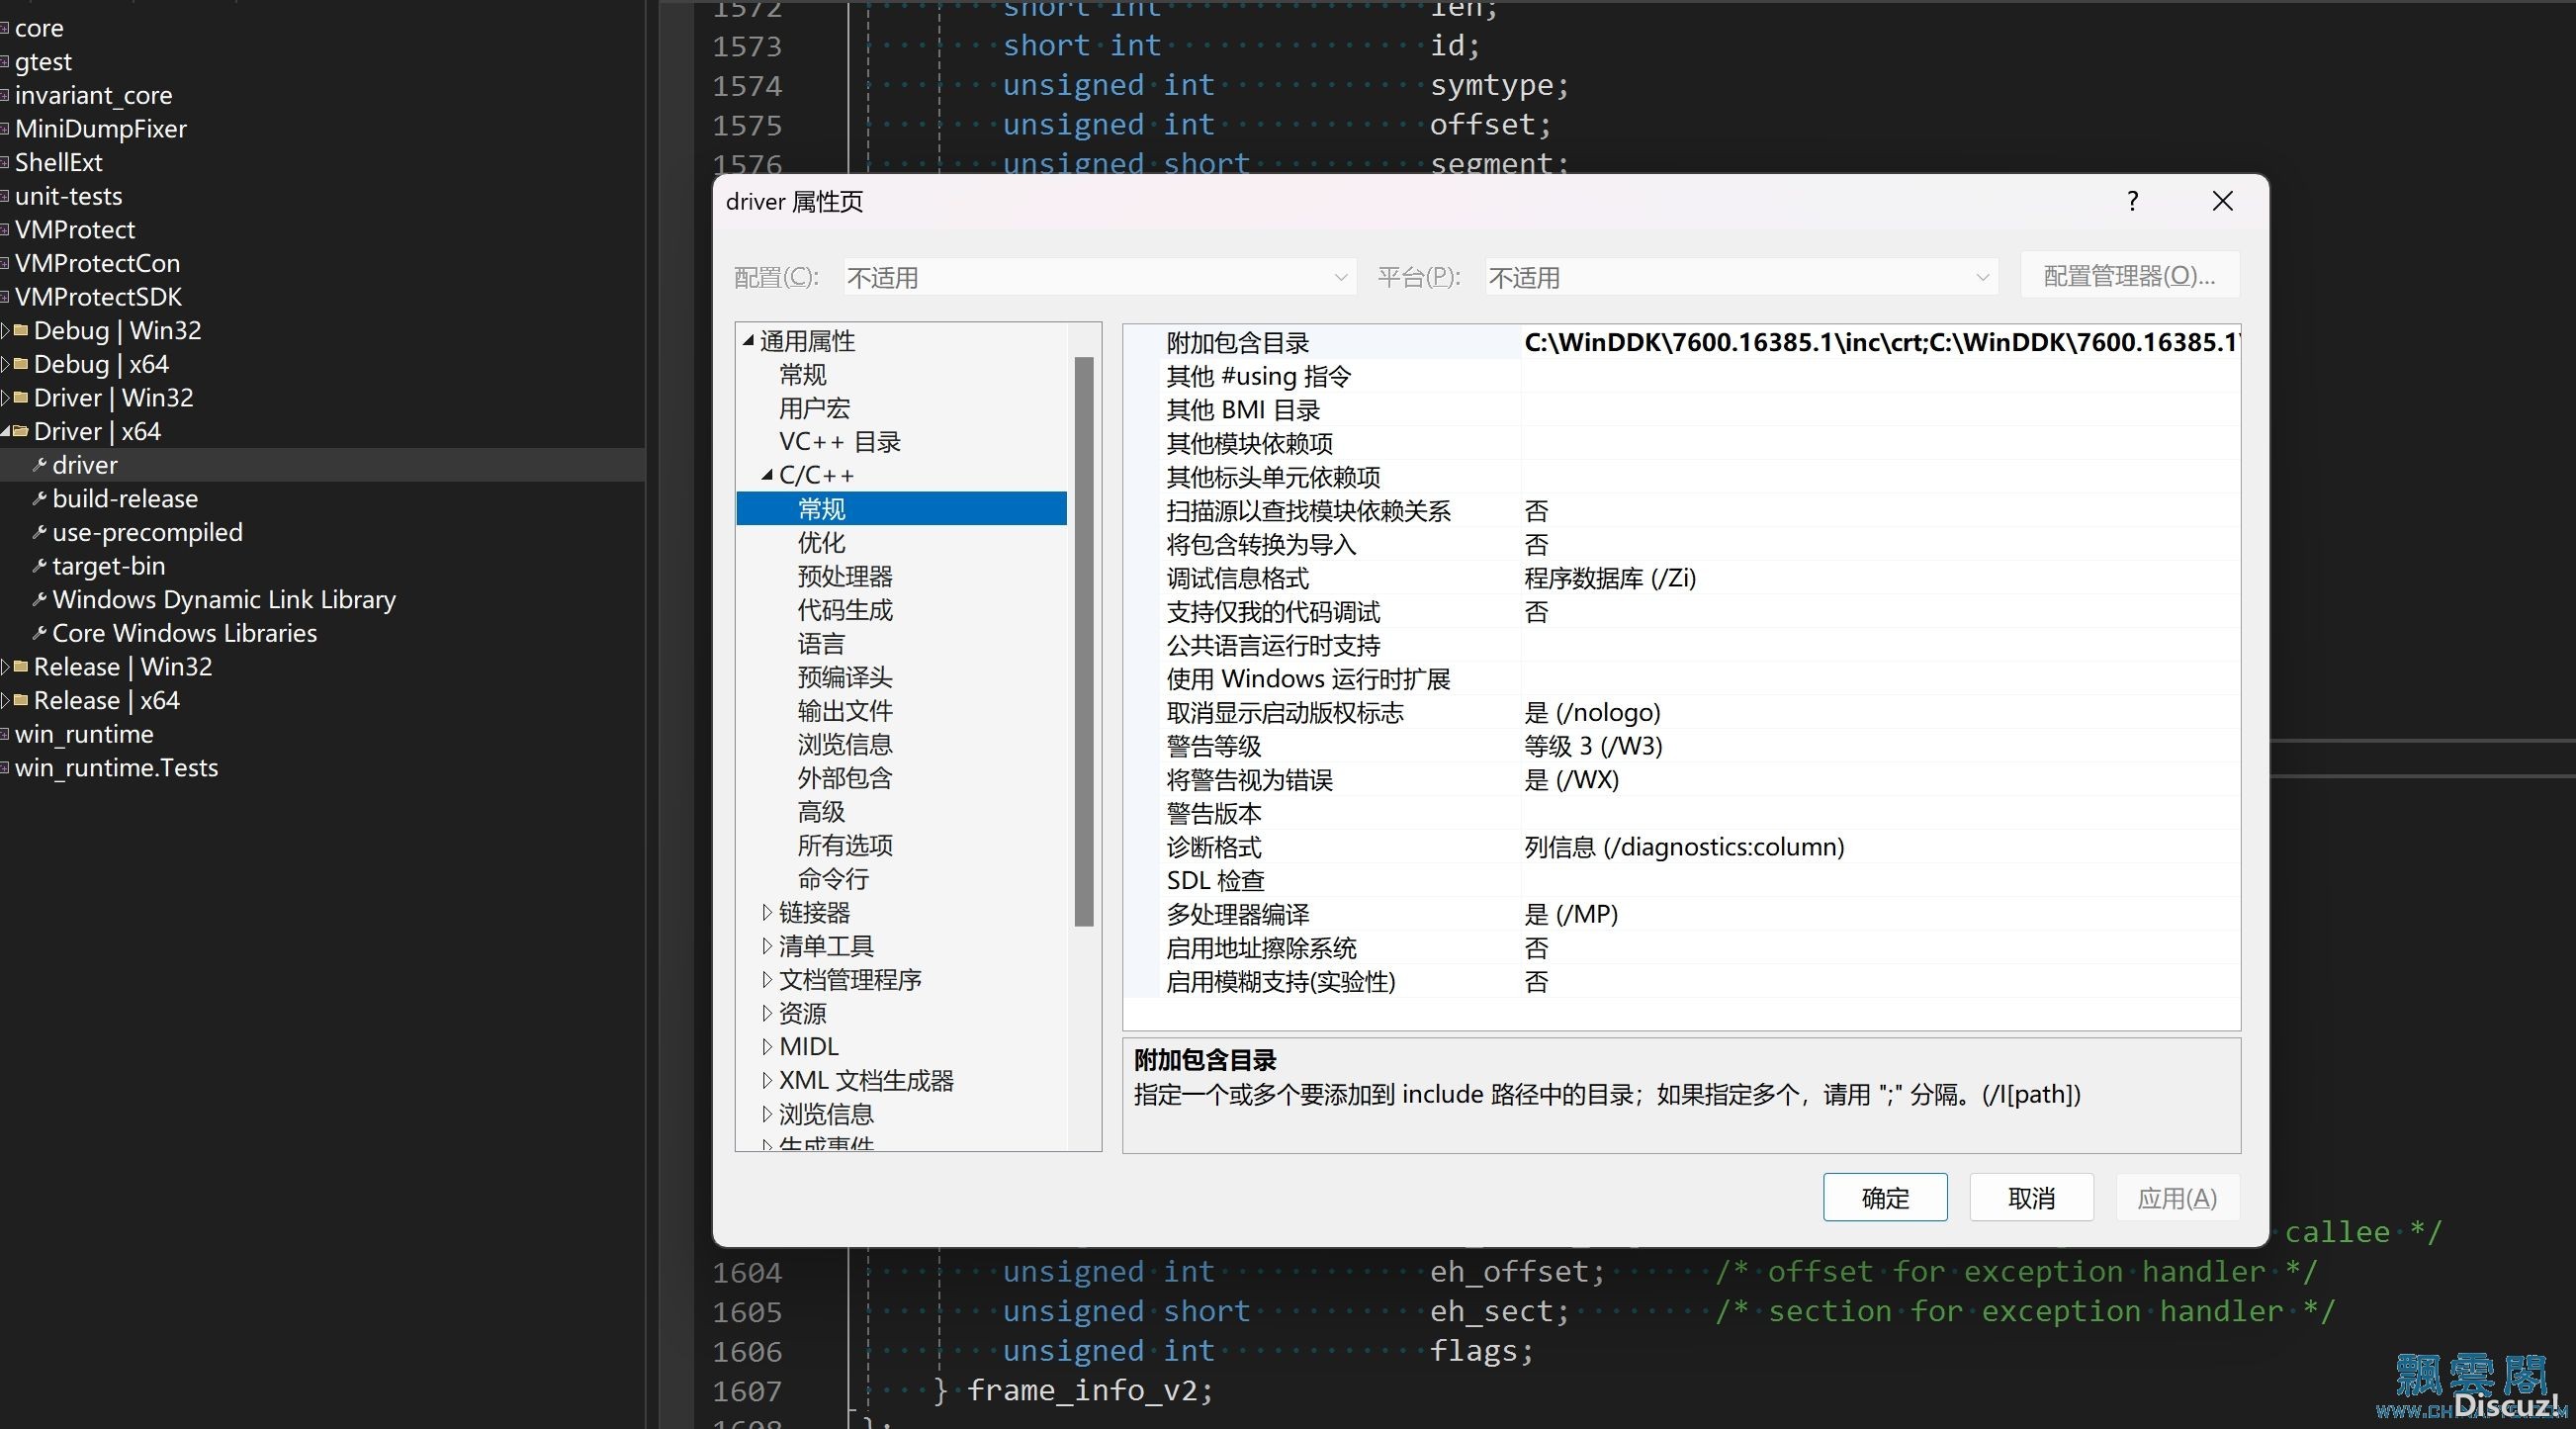
2.1.5.2 MSVC选择用MSVC2017或者msvc2017XP即可顺利编译

2.1.6 .Net编译
2.1.6.1 SDK和.NetCore正常编译,不展开说明。
2.1.6.2 Runtime编译
原VMP作者采用的是.net4.0,笔者升级到4.8后报错如下:
[C++] [color=rgb(51, 102, 153) !important]纯文本查看 [color=rgb(51, 102, 153) !important]复制代码
[backcolor=rgb(27, 36, 38) !important][color=white !important][color=white !important] ?
| Your project does not reference".NETFramework,Version=v4.8" framework. Add a reference to".NETFramework,Version=v4.8" in the "TargetFrameworks"property of your project file and then re-run NuGet restore.
|
解决方法:
右键.NetCore项目-属性,没错就是.NetCore。在目标框架中补充"net48;"。[.Net的别名见微软说明](https://learn.microsoft.com/zh-c ... d-target-frameworks)。
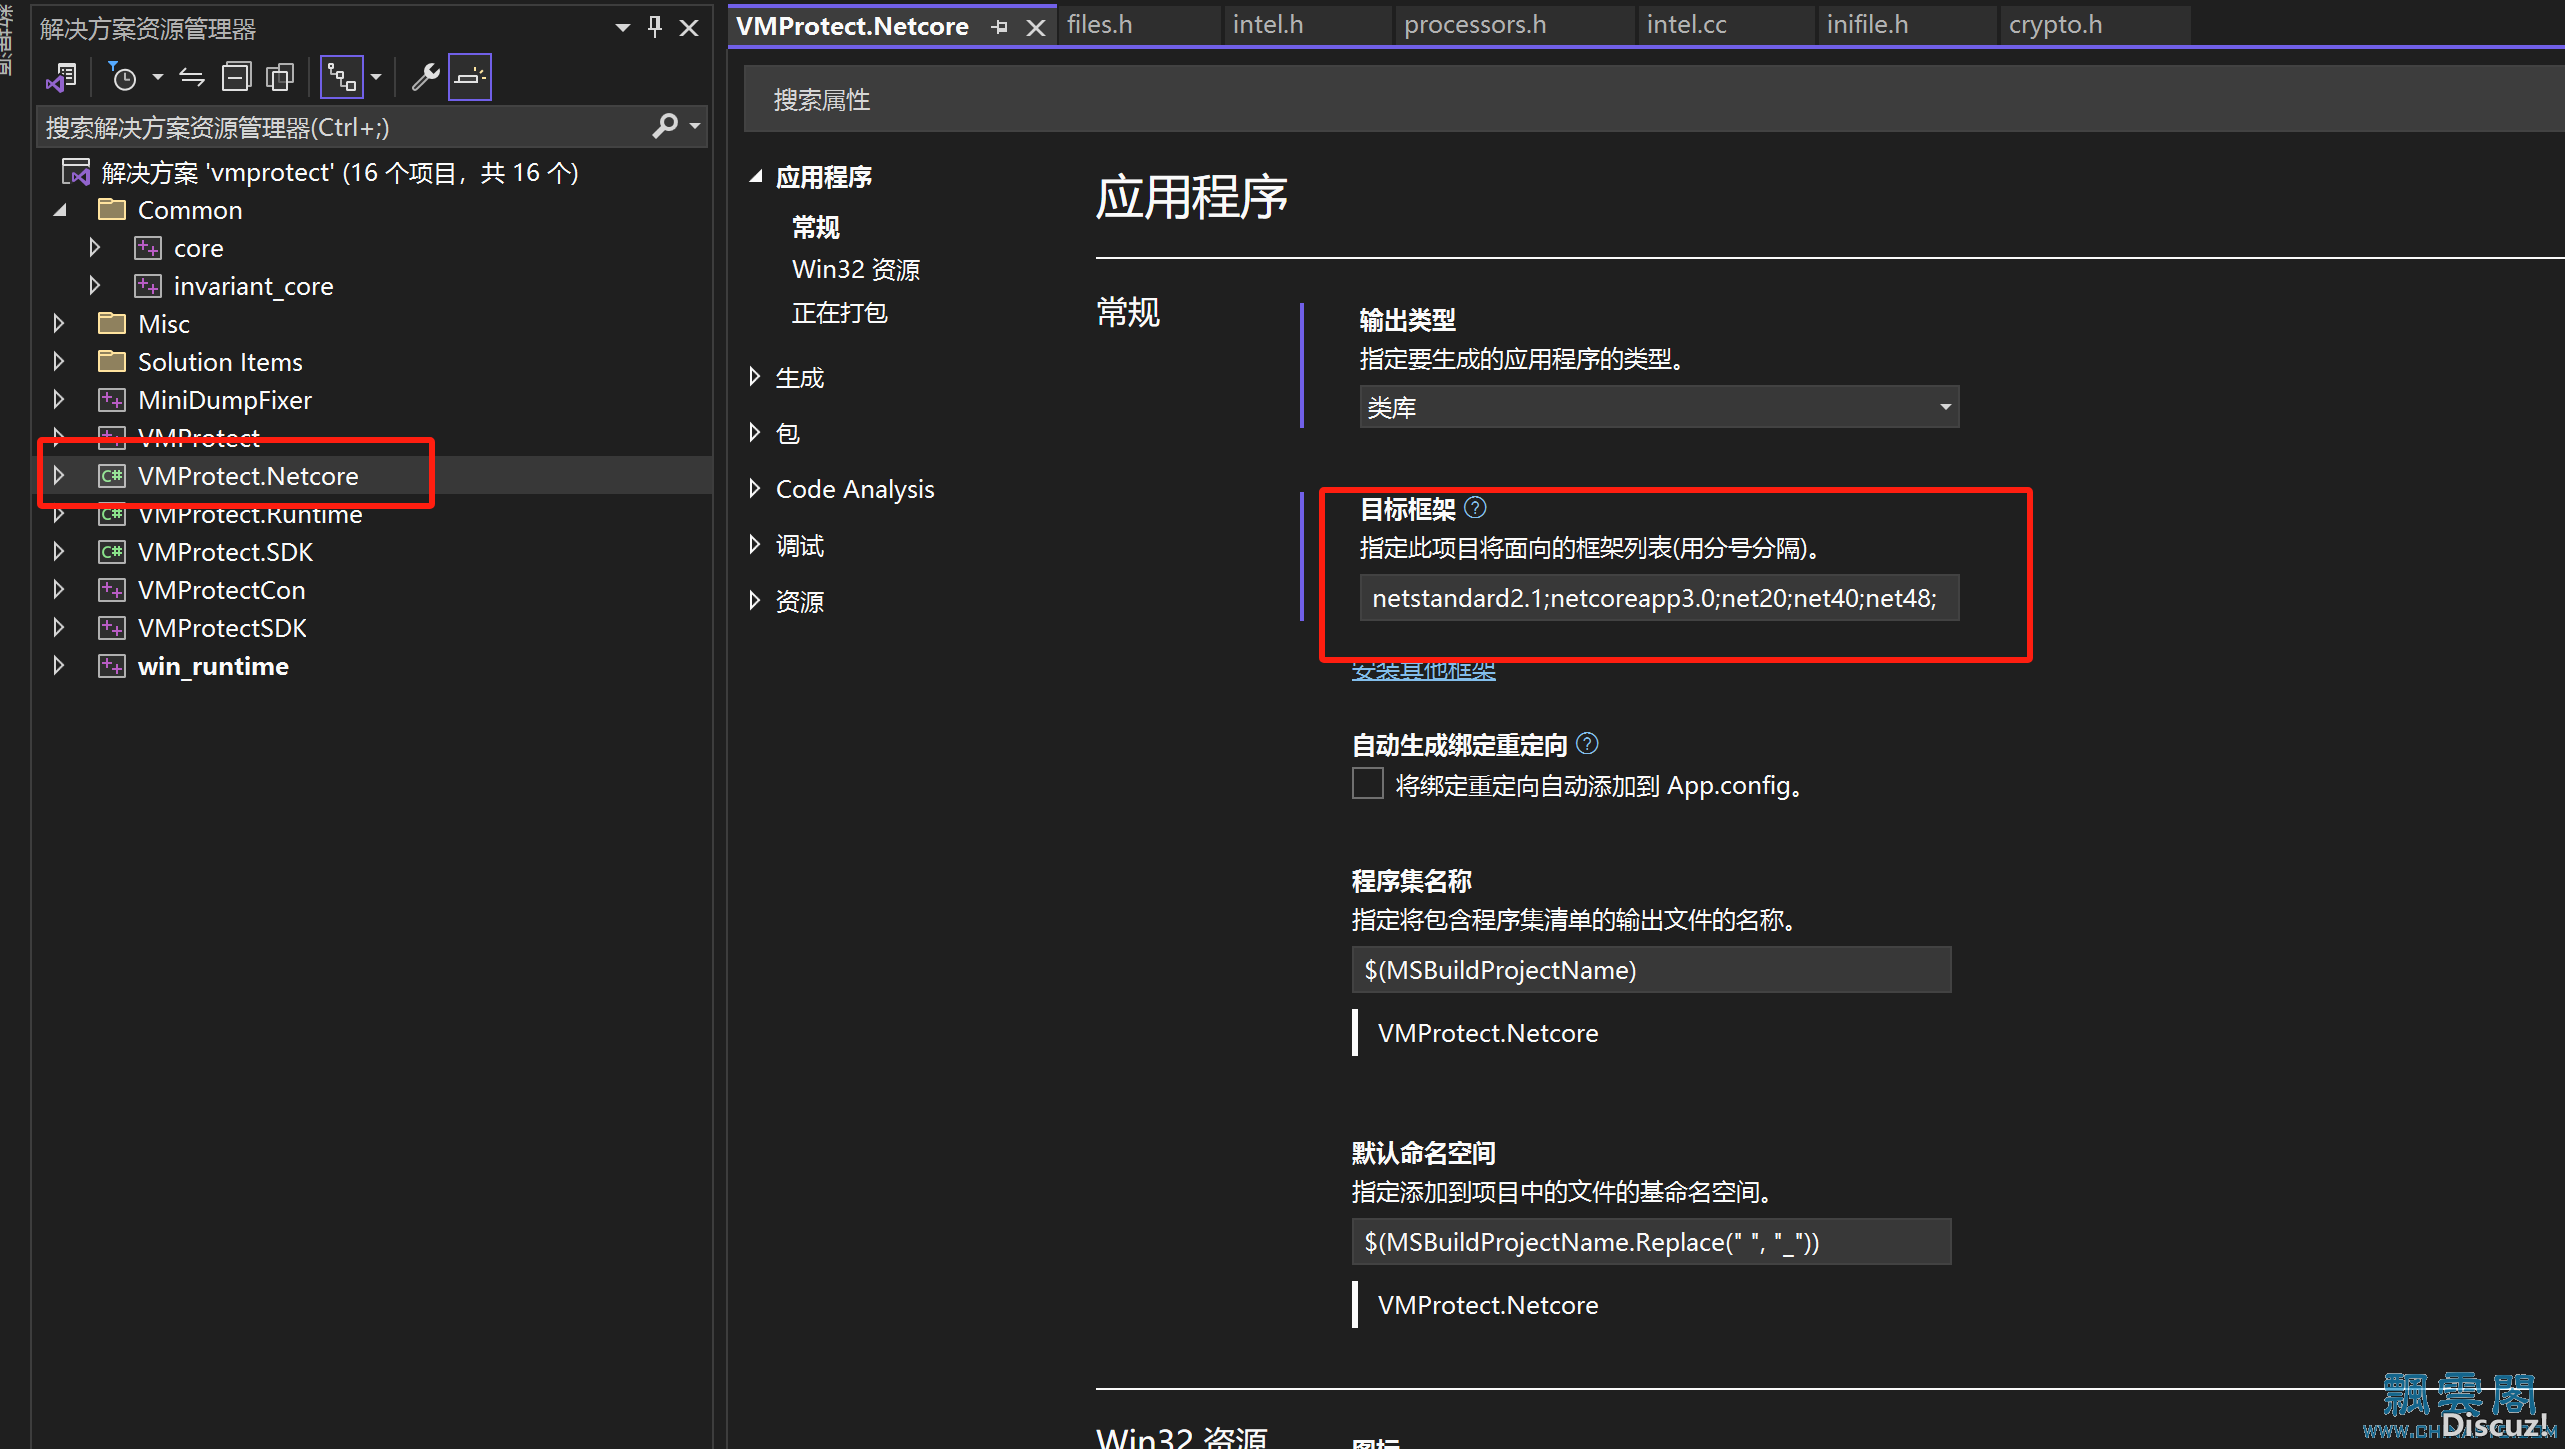
修改后出现新的错误:
[C++] [color=rgb(51, 102, 153) !important]纯文本查看 [color=rgb(51, 102, 153) !important]复制代码
[backcolor=rgb(27, 36, 38) !important][color=white !important][color=white !important] ?
| Your project file doesn't list 'win-x64' asa "RuntimeIdentifier". You should add 'win-x64' to the"RuntimeIdentifiers" property in your project file and then re-runNuGet restore.
|
解决方法:
关闭VS,找到.NetCore的项目文件。路径如下:\runtime\VMProtect.Runtime。以编辑的方式打开。在属性中添加RuntimeIdentifier的定义。
[C++] [color=rgb(51, 102, 153) !important]纯文本查看 [color=rgb(51, 102, 153) !important]复制代码
[backcolor=rgb(27, 36, 38) !important][color=white !important][color=white !important] ?
| <RuntimeIdentifier>win-x64</RuntimeIdentifier>
|
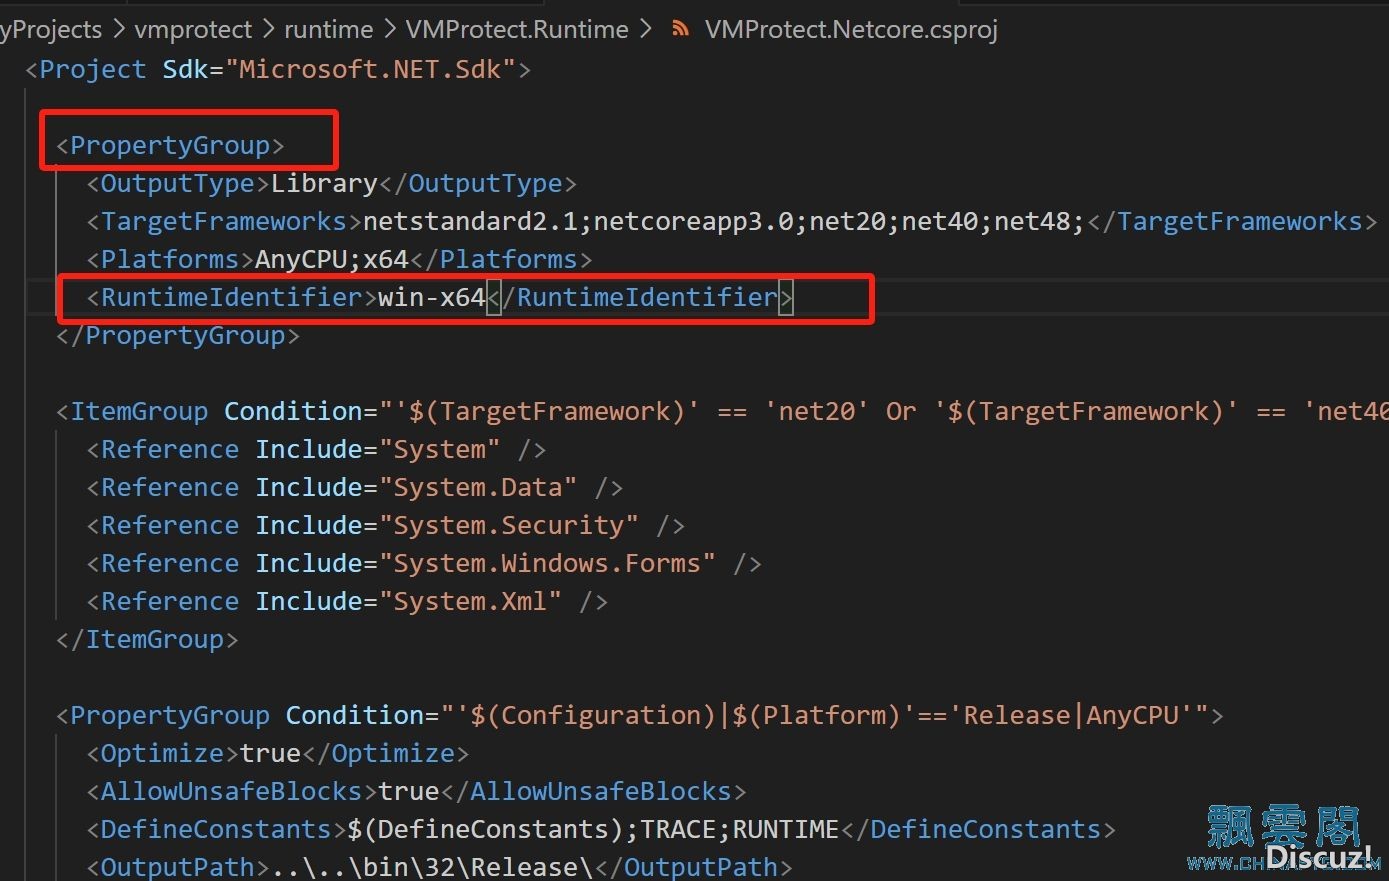
重新打开VS,Runtime编译可顺利编译成功。
2.1.7 Misc——Tests中的的UnitTestProject编译报错:
[C++] [color=rgb(51, 102, 153) !important]纯文本查看 [color=rgb(51, 102, 153) !important]复制代码
[backcolor=rgb(27, 36, 38) !important][color=white !important][color=white !important] ?
| error CS0030: 无法将类型“object”转换为“System.TypedReference”
|
解决方法:
笔者不懂.Net,Gpt给的解决方法:把[C#] [color=rgb(51, 102, 153) !important]纯文本查看 [color=rgb(51, 102, 153) !important]复制代码
[backcolor=rgb(27, 36, 38) !important][color=white !important][color=white !important] ?
| (TypedReference)args[0]`改为__makeref(args[0])
|
。
重新编译即可。
2.2 编译Ultimate版本(静态链接QT)
2.2.1 VMP工程中的Ultimate版本使用的是静态编译的QT,网上没找到现成的。只能自行编译。由于QT协议问题,本文不提供静态QT文件。具体教程请自行摸索。[QT源码下载](https://download.qt.io/new_archive/qt/5.6/5.6.0/single/)]
2.2.2 静态编译QT注意事项
2.2.2.1 要支持xp:SDK需要使用win7.1A,vs2022安装后路径如下:C:\Program Files (x86)\Microsoft SDKs\Windows\v7.1A\,分别设置nmake环境中的bin、include、lib为win7.1A的。
2.2.2.2 config编译选项时,需要编译带opengl的QT(-opengldesktop),支持xp平台( -target xp)
2.2.2.3 编译踩到的大坑:config有增量选项时,不一定会生效,需要重新解压。
2.2.2.4 使用nmake编译大概需要15GB的硬盘空间,编译时间大概2小时。
2.2.3 静态QT编译后参照上文中2.1.4.1 修改QT路径。
2.2.4 编译VMProtect 三方库报错如下:
[C++] [color=rgb(51, 102, 153) !important]纯文本查看 [color=rgb(51, 102, 153) !important]复制代码
[backcolor=rgb(27, 36, 38) !important][color=white !important][color=white !important] ?
| ..\third-party\libffi\libffi64.lib”是使用比创建其他对象所用编译器旧的编译器创建的;请重新生成旧的对象和库
|
解决方法:采用msvc_2017_xp编译器编译,libffi源码在github上。
替换libffi64后,至此VMProtect Ultimate静态编译成功。

三、VMP许可集成 3.1 生成自定义序列号
3.1.1 使用编译好的VMProtect打开.vmp文件,.vmp路径:\core\vmprotect.vmp。在项目-添加-许可,添加自定义的信息,然后保存即可
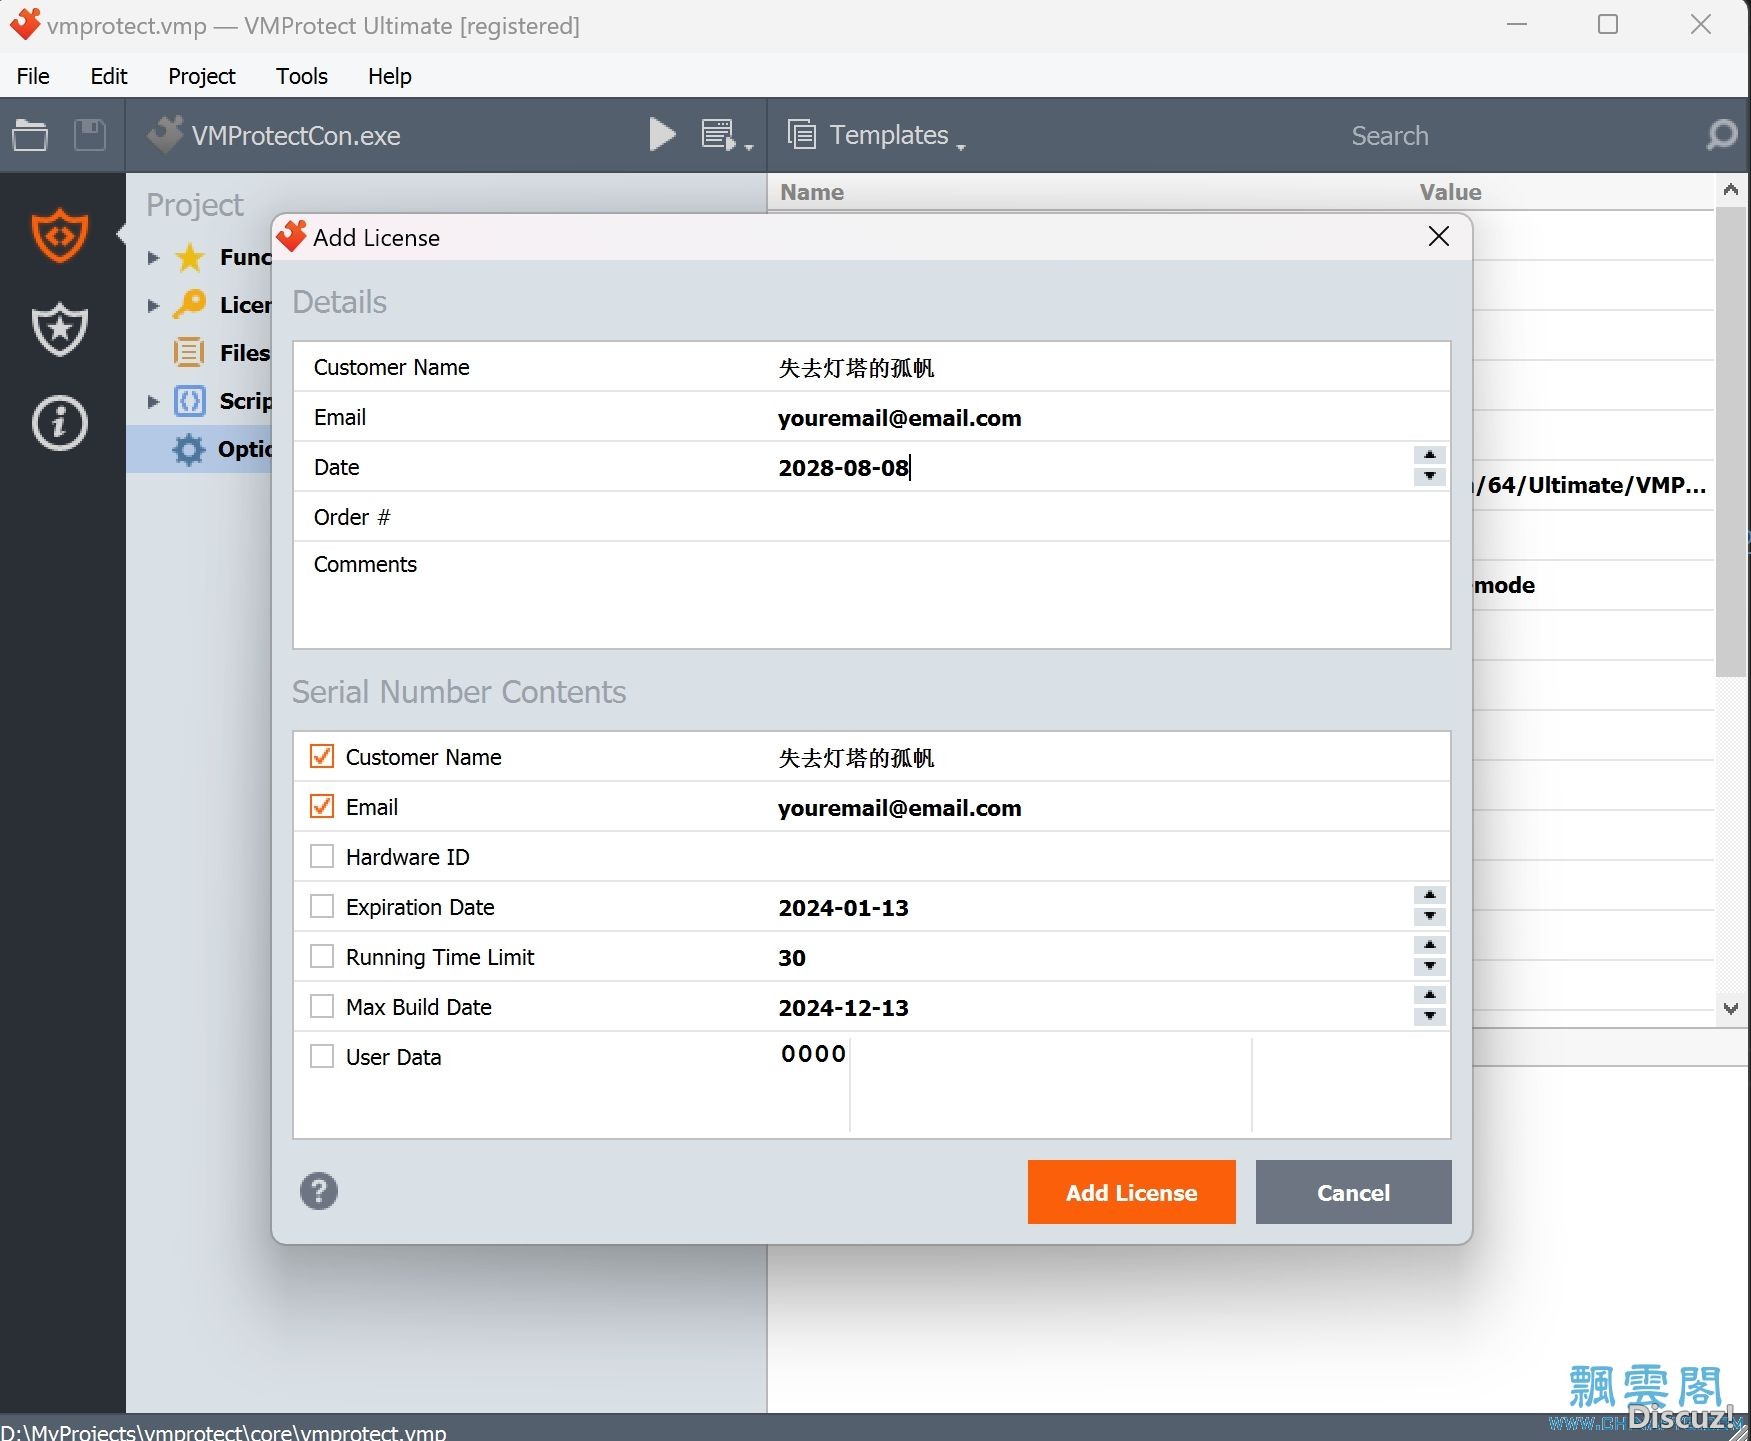
3.1.2 以编辑的方式打开.vmp文件,找到复制刚才添加的序列号,新建一个文件保存。
3.1.3 删除.vmp文件的以下lua代码段
[C++] [color=rgb(51, 102, 153) !important]纯文本查看 [color=rgb(51, 102, 153) !important]复制代码
[backcolor=rgb(27, 36, 38) !important][color=white !important][color=white !important] ?
| --2223 - Testing Purposes and Demo watermark Customer ID
localwatermark = watermarks:itemByName("2223")
if(watermark) then
add_watermark:xproc(version_watermark_command:address(),watermark:value())
else
error("TestingPurposes and Demo watermark was not found in the database");
end
|
没删在对VmpProtectCon加壳会提示函数地址占用。
[C++] [color=rgb(51, 102, 153) !important]纯文本查看 [color=rgb(51, 102, 153) !important]复制代码
[backcolor=rgb(27, 36, 38) !important][color=white !important][color=white !important] ?
| AddFunction("__scrt_common_main_seh(void)")
|
3.2 VMProtect加壳并集成许可
3.2.1在目录下打开命令行,使用VMProtectCon进行加壳。暂时需要带VMProtectLicense.ini。
VMProtectCon的参数如下:
[Bash shell] [color=rgb(51, 102, 153) !important]纯文本查看 [color=rgb(51, 102, 153) !important]复制代码
[backcolor=rgb(27, 36, 38) !important][color=white !important][color=white !important] ?
| VMProtect_Con File [Output File] [-pfProject File] [-sf Script File] [-lf Licensing Parameters File] [-bd Build Date(yyyy-mm-dd)] [-wm Watermark Name] [-we]
|
正式cmd命令如下,添加-key参数,原因:.vmp的lua对-key解析将序列号并集成到文件。
[C++] [color=rgb(51, 102, 153) !important]纯文本查看 [color=rgb(51, 102, 153) !important]复制代码
[backcolor=rgb(27, 36, 38) !important][color=white !important][color=white !important] ?
| VMProtectCon.exe VMProtectCon.exe VMProtectConVmp.exe -pf vmprotect.vmp -key key.txt
|
3.2.2 使用加壳并许可的VMProtectCon.exe对VMProtect.exe进行加壳并集成许可
[C++] [color=rgb(51, 102, 153) !important]纯文本查看 [color=rgb(51, 102, 153) !important]复制代码
[backcolor=rgb(27, 36, 38) !important][color=white !important][color=white !important] ?
| VMProtectCon.exe VMProtect.exe VMProtectVmp.exe -pf vmprotect.vmp -key key.txt
|
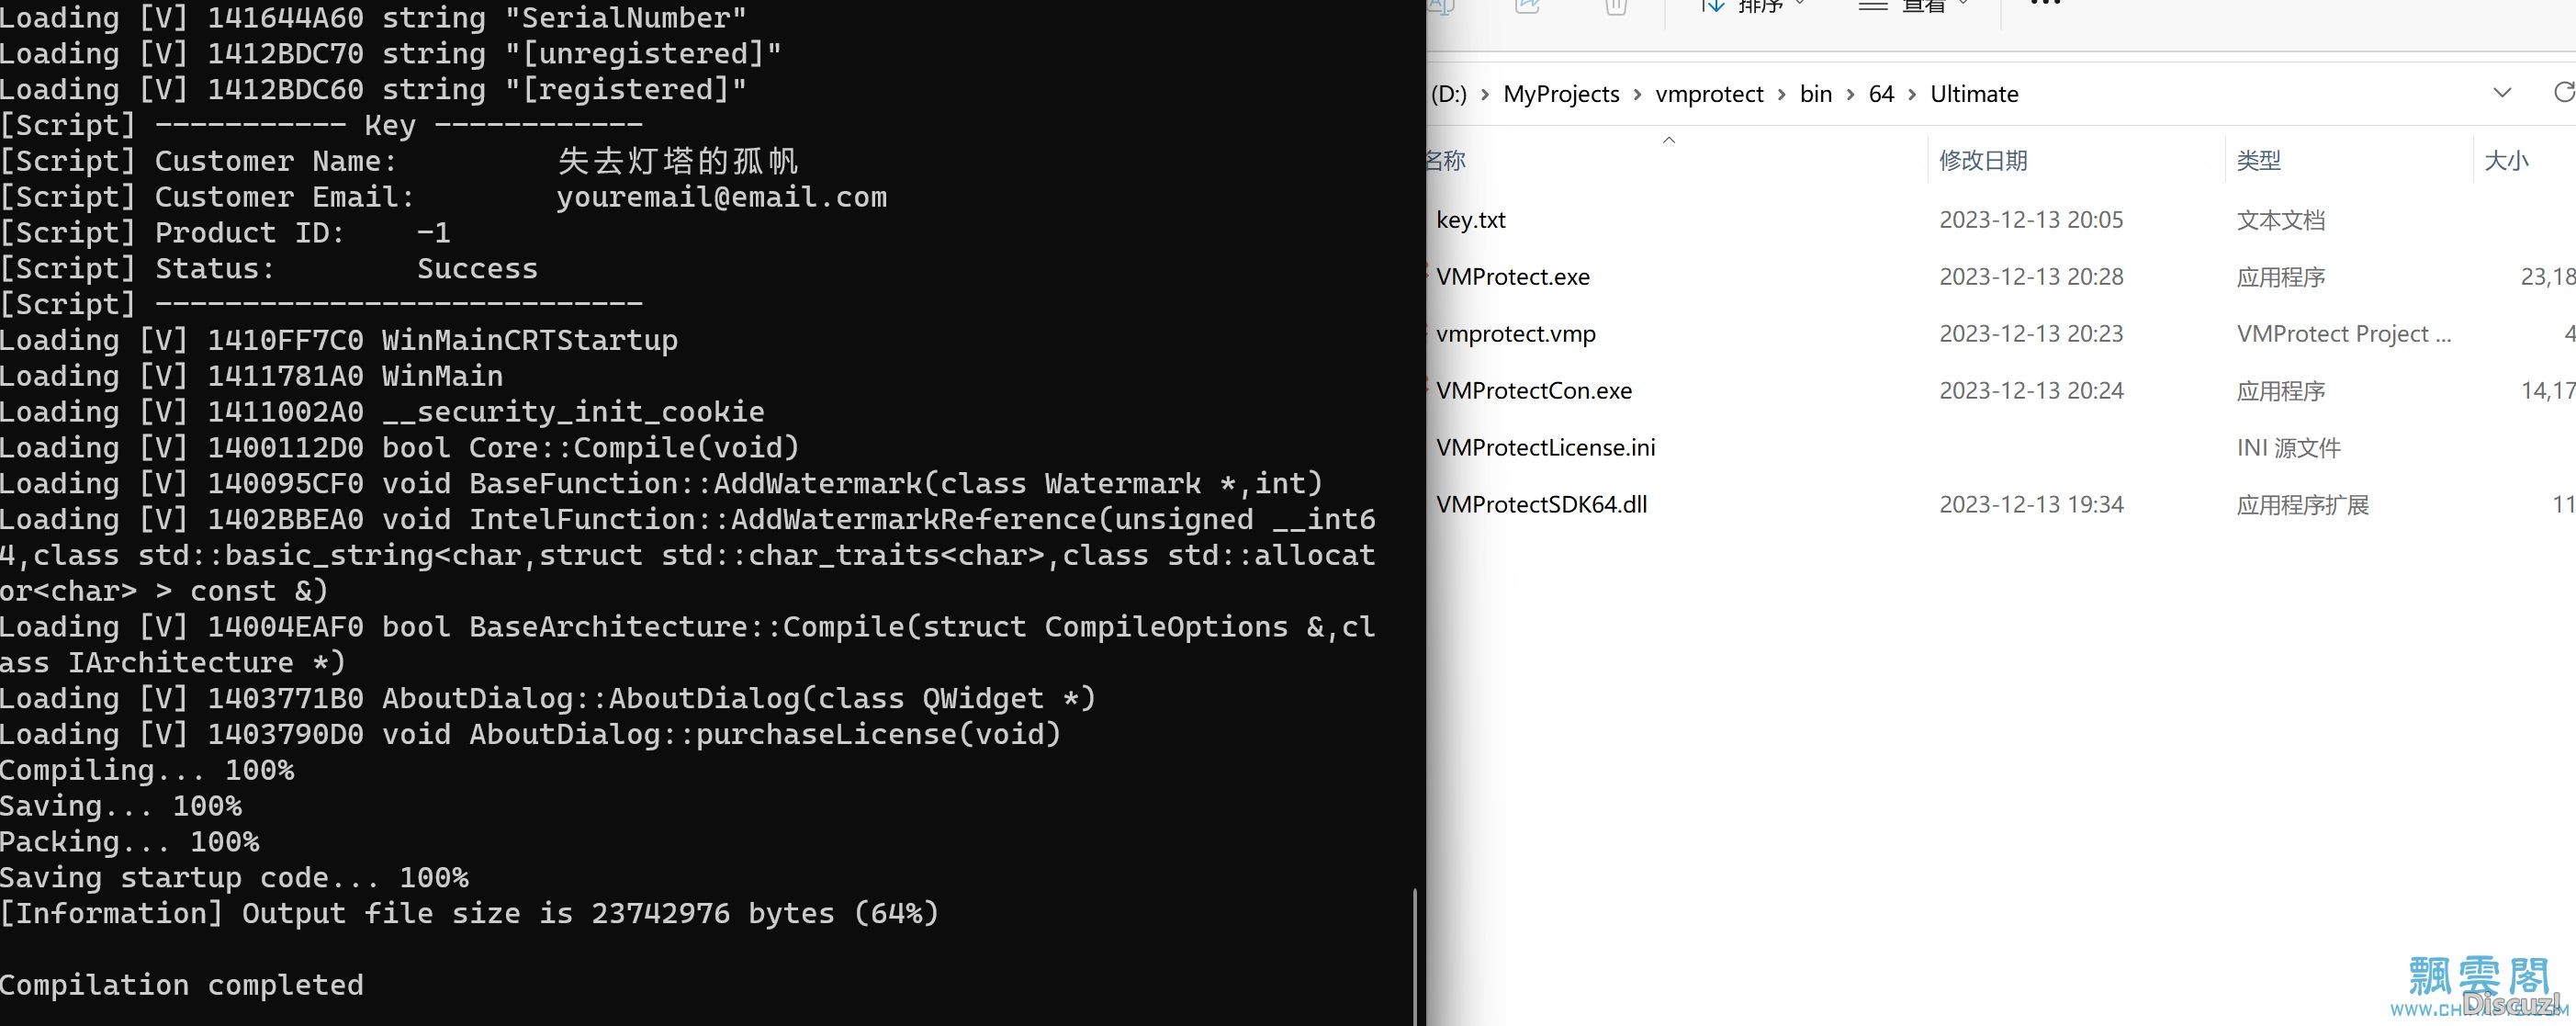
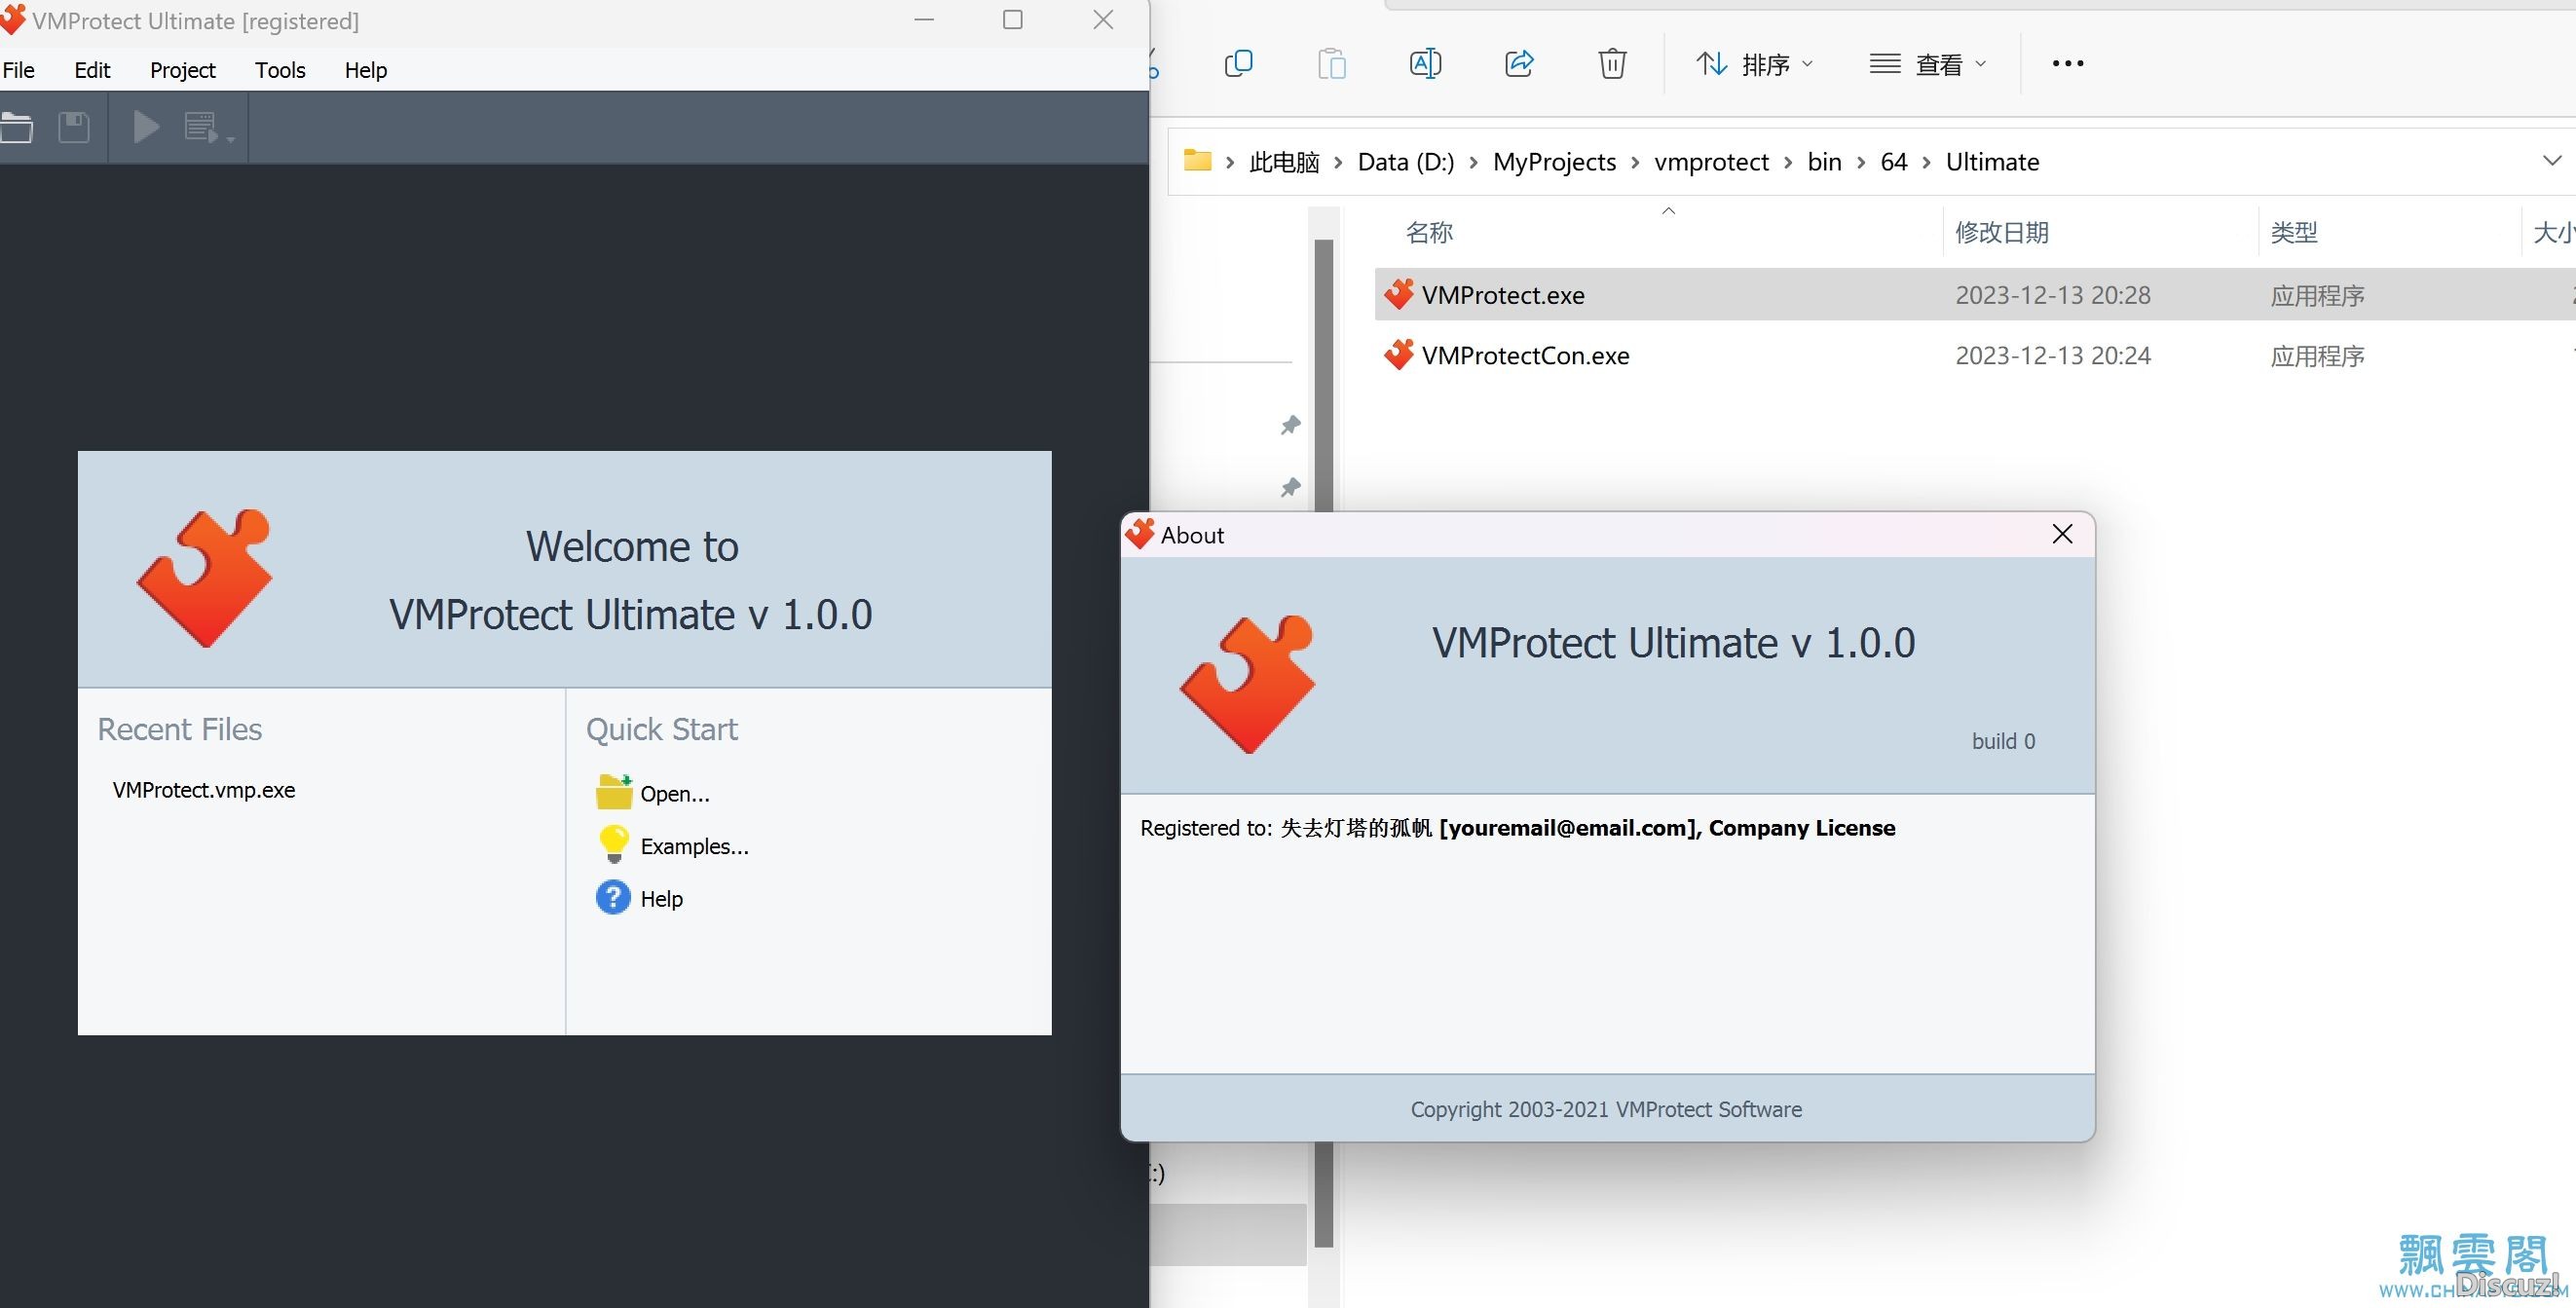
四、最终效果:带许可的静态编译的ultimate版VMProtect
|
|